Understanding LDAP Search Filters
To understand a search filter, follow its path by reading it from right to left. The right-most component is the root of the tree, then follow the branch to the left-most component, which is the node (leaf) where the user will be found. For example, the following search filter...
(&(userPrincipalName=%s)(memberOf=cn=ice3 Users,ou=ice2,ou=ice1,dc=example,dc=com))
...can be read as:
Define a search filter to bulk import from multiple branches of the same search base using the following template:
(&(objectClass=person)(|(memberOf=cn=ice3 Users,ou=ice2,ou=ice1,dc=example,dc=com)(memberOf=cn=iceb Users,ou=icea,ou=ice1,dc=example,dc=com)))
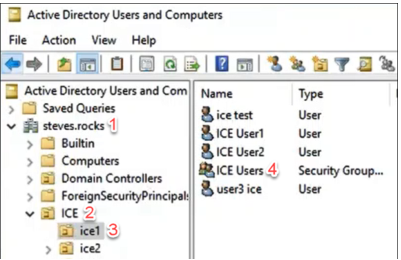
The following image is a visual example of an AD tree as displayed in AD Explorer:

A search filter looking for a user in the ICE Users group, would look like this:
(&(userPrincipalName=%s)(memberOf=cn=ICE Users,ou=ice1,ou=ICE,dc=steves,dc=rocks))
steves.rocks: dc=steves,dc=rocks
ICE: ou=ICE
ice1: ou=ice1
ICE Users: memberOf=cn=ICE Users
To find a search path in AD Explorer
1. In an AD Explorer window, navigate to a folder or object in the directory tree.
2. Right-click the folder or object and then click Properties.
3. In the Attribute Editor tab, Scroll down the Attributes list to the distinguishedName attribute.


4. The distinguishedName value provides the path which can be used to build the search filter.