Creating a Certstore
During installation, the ICE OS Installation Wizard provides the option to create a certstore for the ICE Server. If your ICE Server was installed without this option, or you need to create a new certstore, then use the instructions in this section to create a private certstore for your ICE deployment.
Important: When copying and pasting the code below, the hyphens in the code may break the line. After pasting, ensure each line begins with either openssl or ./ecstool. If a line begins with a hyphen, then it is broken and there is a return before the hyphen that must be deleted to restore the command. For example, in the following line of code, the hyphen has broken the line and there is a hidden return in front of the slash.


Delete the hidden return so that the entire command appears on one line only.
To create the private certstores
1. Deploy an ICE Agent.
2. Run the following commands to ensure you have read/execute permissions for the bin and cert directories.
chmod +x <path to ice-agent>/bin/ecstool
chmod +rx <path to ice-agent>/bin
chmod +rx <path to ice-agent>/cert
3. Run the following command to create the certstore:
./agent tools cert create-certstores
The certstore is created. Files are in the /cert/ directory.
To manually create a private certstore
1. Run the following commands to create the required certificates:
A. Create a CA certificate and private key:
openssl genrsa -out ice-ca.key 2048
openssl req -x509 -new -nodes -key ice-ca.key -sha256 -days 3650 -out ice-ca.pem
B. Create a Client-Side certificate and key, signed by CA:
openssl genrsa -out ice-client.key
openssl req -new -key ice-client.key -out ice-client.csr
openssl x509 -req -in ice-client.csr -CA ice-ca.pem -CAkey ice-ca.key -CAcreateserial -out ice-client.pem
C. Create Server-Side certificate and key, signed by CA:
openssl genrsa -out ice-server.key
openssl req -new -key ice-server.key -out ice-server.csr
openssl x509 -req -in ice-server.csr -CA ice-ca.pem -CAkey ice-ca.key -CAcreateserial -out ice-server.pem
2. Run the following commands to create the certstores.
A. Create an Infra certstore:
./ecstool infra.certstore create
./ecstool infra.certstore --tags:-enginedefault add iceDefaultClientCert ice-client.pem ice-client.key
./ecstool infra.certstore --tags:-rpwsdefault,-rpdefault add iceDefaultRpCert ice-server.pem ice-server.key
./ecstool infra.certstore --tags:-cadefault add iceDefaultCA ice-ca.pem
B. Create a RallyPoint certstore:
./ecstool RallyPoint.certstore create
./ecstool RallyPoint.certstore --tags:-rpwsdefault,-rpdefault add iceDefaultRpCert ice-server.pem ice-server.key
./ecstool RallyPoint.certstore --tags:-cadefault add iceDefaultCA ice-ca.pem
C. Create a Client certstore
./ecstool client.certstore create
./ecstool client.certstore --tags:-enginedefault add iceDefaultClientCert ice-client.pem ice-client.key
./ecstool client.certstore --tags:-cadefault add iceDefaultCA ice-ca.pem
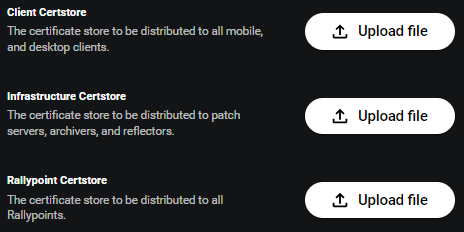
3. On ICE Desktop, navigate to the Settings > Organization page and perform the following steps.


Note: The certstore files should be located in the Bin directory.
A. Upload the Infra certstore to the Infrastructure Certstore.
B. Upload the Rallypoint certstore to the Rallypoint Certstore.
C. Upload the Client certstore to the Client Certstore.
4. Validate the certstores. See Validating a Certstore (next).