Creating a VM for the ICE Server OS
This section describes how to create a virtual machine for hosting the ICE Server operating system using VMware ESXi.
Note: You are advised to load all ISO(s) to a datastore and boot them from there. While ICE OS can be booted from live media (DVD), the live media must be mounted and remain mounted, otherwise the OS will crash.
Requirements:
Refer to Virtualization Guidance.
Network Time Procol Synchronization
ICE Servers operating in a multiserver Group environment are dependent on accurate time synchronization for election and failover. This includes georedundant systems. To prevent synchronization issues, ensure your ESXi host is connected with and using an NTP Server.


GEOREDUNDANCY:
Repeat the following procedure and create two VMs: DC1 and DC2.
Repeat the following procedure and create two VMs: DC1 and DC2.
To create an ICE Server host VM
1. Open VMware.
2. Click Create / Register VM to open the New virtual machine wizard.
3. In the Select creation type screen, click Create a new virtual machine, then click Next.
4. In the Select a name and guest OS screen, perform the following operations:
A. Name the VM.
B. Compatibility: ESXi 6.5 (or later) virtual machine.
Note: Older versions are NOT recommended. Instant Connect does not support the use of obsolete hypervisors, such as VMware ESXi versions older than 6.5. Instant Connect cannot provide installation, performance, or server-related support to customers using these virtualization products.
C. Guest OS family: Linux
D. Guest OS version: Other Linux (64-bit)
E. When complete, click Next.
5. From the Select storage screen, select the datastore which contains the ISO file(s). Ensure the size is equal to or greater than the minimum required space based on the deployment size specified in your pre-installation planning. Click Next. The Customize settings screen opens.
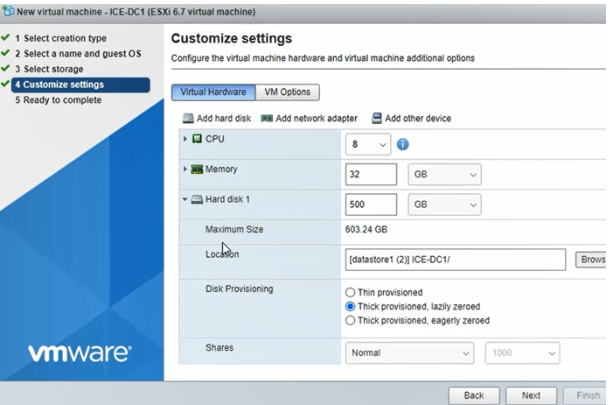
6. In the Customize settings screen, perform the following operations.


A. In the CPU menu select 4, 8, 12 , or 16 (minimum based on lite, small, medium, or large deployment size)
Important: Storage size cannot be changed after the VM is created, so verify the space is available before proceeding.
Cores per Socket: Same as for CPU or as close as possible.
Limit: Unlimited
Shares: High
B. In the Memory field enter 16Gb, 32Gb, 48Gb, or 64Gb (minimum based on lite, small, medium, or large deployment size)
Reservation: Same as Memory. Also select Reserve all guest memory (All locked).
C. In the Hard disk 1 field enter 250Gb, 500Gb, 750Gb, or 1Tb (minimum based on lite, small, medium, or large deployment size)
Disk Provisioning: Thick Provisioned, Eagerly Zeroed (recommended), Thick Provisioned, Lazily Zeroed (acceptable)
Shares: High. If Limit - IOPS is configured, then set Shares to the maximum allowed.
D. Network Adapter 1: The selected network must have a working DNS server. Also select Connect at Power On.
E. CD/DVD Drive 1: Select the Datastore ISO file. From the Datastore browser, select the .iso file for this release i.e. iceos-release-3.6.5-git-e61036a-6265.iso. Also select Connect at Power On.
F. For air gap: CD/DVD Drive 2: Select Datastore ISO file. In Datastore browser, select iceos-airgap-release-3-6-5-44600.44601.iso. Also select Connect at Power On.
Note: Drive 1 must be for the iceos-git ISO file. Drive 2 must be for the airgap ISO file. You may need to add a second drive to the VM:
1. Select Add other device.
2. Select CD/DVD drive.
The second drive is added to the VM.
The second drive is added to the VM.
VMware may list the drives in reverse order, so check drive details. The iceos-git ISO is for the master drive and the airgap ISO is for the slave drive.
G. When completed, click Next.
7. In the Ready to complete screen, click Finish.
Wait for VM creation to complete. Time is required for disk provisioning.
Wait for VM creation to complete. Time is required for disk provisioning.
8. In the VMware directory, right-click the newly created ICE OS VM, and click Edit Settings.
9. Set VM Options > Advanced > Latency Sensitivity to Medium.
Note: If using VMware's vCenter Server, the Medium option may not appear, so instead use their ESXi to access the VM and select Medium.
10. Set VM > Boot Options > Firmware to BIOS.
11. GEOREDUNDANCY:
Repeat this procedure to create the second VM for DC2.
Repeat this procedure to create the second VM for DC2.
VM Creation Completed
Proceed to the next section: ICE OS Terminal Access for instructions on accessing the ICE OS through a terminal connection to set node configuration, obtain access codes, and verify connectivity.