Linguistic Service Configuration
This section explains how to configure a Linguistics Service Provider for your ICE Server. Before continuing, ensure you have obtained the required license keys from your IT department.
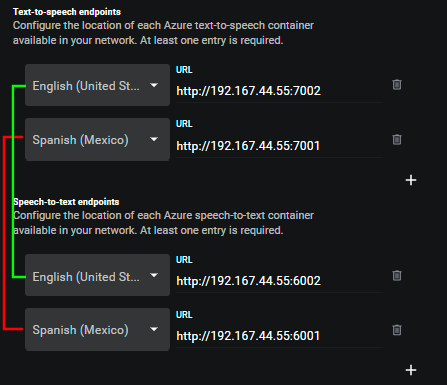
The following procedure asks you to identify two endpoints, one for text-to-speech (aka TTS), and one for speech-to-text (aka voice transcription). When you create the first endpoint, the other is automatically created. Actions performed on one also occur on its partner. These actions include deletion, addition, and language selection. Only the endpoint URL may differ.
The screenshot below shows text-to-speech and speech-to-text endpoints for two languages. The green and red brackets show the connection between the endpoints.


Note: You can delete an endpoint by selecting the Delete (trash) button. Note that when a (text-to-speech or speech-to-text) endpoint is deleted, then the corresponding endpoint is also automatically deleted.
To configure linguistic service
1. Navigate to the Settings > Organization > Linguistics tab.
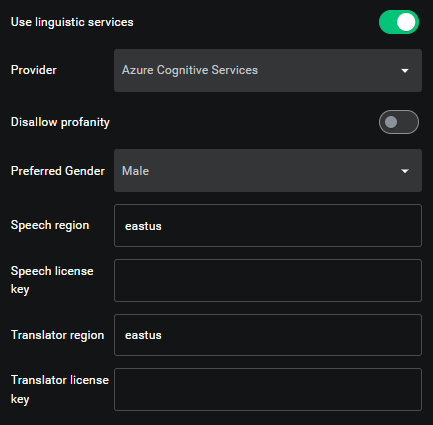
2. Click to activate linguistic services.

The configuration fields appear.


The configuration fields appear.

3. In the Provider menu, select a linguistic service translation provider. The configuration fields below the menu change based on your selection.
4. Once you have selected a Provider, complete each of the following fields.
NOTE: This procedure provides instructions for all fields of all Providers. If a field does not appear in your UI, then continue to the next field.
Select to omit audio and text when profanity is detected. Profanity is replaced with a string of *****, in text. In translated transcripts the profanity is replaced with the term 'profanity.'
Male or Female translation voice. This selection applies to all Translations and translated channels, however, if your linguistic service provider does not support both genders, then it can only respond in its default supported voice gender.
Specify a Speech Region code. Refer to Speech Service Supported Regions for a list of valid Speech Region values. For example: southafricanorth or westus or westeurope.
Specify a Region code. Refer to Regions and Zones for a list of valid Region values.
Some examples include: us-east-1 or eu-west-2 or ap-northeast-3.
Specify the URL specific to your translation provider and region.
Specify the language and URL of the text-to-speech container in your network.
Paste your Speech License Key.
Log in to Azure and search for the Translator service. Select and open the Translator service. The region information is on the Location tab of the translator object.
Log in to Azure and search for the Translator service. Select and open the Translator service. In the region information on the Location tab, click the Manage Keys hyperlink to copy the translator service key.
If you are using AWS PrivateLink to create an interface VPC endpoint, then enter the endpoint URL here.
To find and copy your AWS Access Key and Secret Key, log in to the AWS Management Console, click your account name, and select My Security Credentials. In the Access keys section, you can view existing keys or create new ones. If you create a new key, copy the Secret Access Key immediately as it will only be shown once. Store your keys securely and do not share them with unauthorized parties. For detailed steps, refer to the AWS documentation.
Enter the URL to the Azure translator container in your network
Specify the language and enter the URL to each Azure text-to-speech container in your network. You must have at least one URL. Click the + icon to add a new URL.
Specify the language and enter the URL to each Azure speech-to-text container in your network. You must have at least one URL. Click the + icon to add a new URL.
5. Click the Save button.