
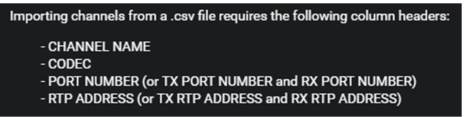
Creating a Bulk Channel Import .CSV File
The first row (paragraph) of the .CSV file contains the headers. All other rows must (paragraphs) must follow the order of the headers. If opened in a spreadsheet, the headers are the columns, and the paragraphs are the rows (as shown below). Each column is a channel attribute. Each row is a channel.

You can edit your .CSV file in a spreadsheet editor, but if you choose to do so, ensure the document is saved as UTF-8 encoded comma-delimited list with a .CSV extension. If errors are detected during an import, you will be given the opportunity to review and cancel without importing.
To create a channel bulk import .CSV file
1. Open a text editor.
2. Copy and paste the following import template into the text editor.
CHANNEL NAME,RX RTP ADDRESS,TX RTP ADDRESS,RX PORT NUMBER,TX PORT NUMBER,CODEC,PERSON GROUP,ENCRYPTED,DESCRIPTION,AUDIO STREAM ID,INTEROPERABILITY
ChannelName,224.0.0.0,224.0.0.0,20000,7200,G.711 A-law (64 kbps),GroupA,Y,A2,STREAM_ID,Default
3. In the text editor, modify the following required channel properties as follows:
ChannelName,
Replace with the name of your channel.
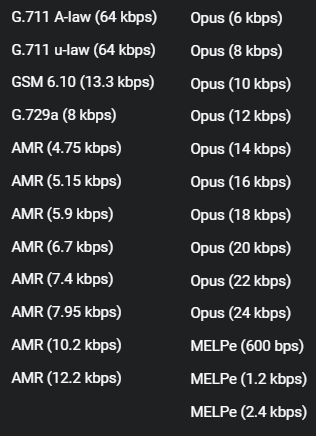
G.711 A-law (64 kbps),
Enter a supported Codec. The text entered must match the Codec name exactly. You can find the Codec names in the Settings > Channels > Advanced Settings > Codec menu on any channel in the ICE Server. For reference, they are also shown below:
20000,
(Rx/Tx) Replace with a valid port number for audio transmission and reception.
Sets both the RX PORT NUMBER and the TX PORT NUMBER to the same port. If you require different ports, then do not include PORT NUMBER and use both of the following:
20000,
(Rx) Replace with a valid port number for reception.
7200,
(Tx) Replace with a valid port for transmission.
20000,
(Rx/Tx) Replace with a valid RTP address for audio transmission and reception.
Sets both the RX RTP ADDRESS and the TX RTP ADDRESS to the same address. If you require different addresses, then do not include PORT NUMBER and use both of the following:
224.0.0.0,
(Rx) Replace with a valid RTP address for audio reception.
224.0.0.0,
(Tx) Replace with a valid RTP address for audio transmission.
4. Add optional headers as needed. The following optional properties are available:

YourDescription,
Enter a description for the channel.
Y,
Leave as Y for encryption, or change to N to transmit in the clear.
STREAM_ID,
Leave this header out and ICE will supply the Stream ID.
Enter a Stream ID only if you require your own custom Stream ID.
Note: ICE does not check for duplicate Stream IDs. Use a long random string of characters to ensure duplication does not occur. Never use the same Stream ID.
GroupA,
Enter a valid Group to allow all members of that Group access to this channel.
5. Save the file and then import the .CSV file to test the results.