Creating a Subordinate License
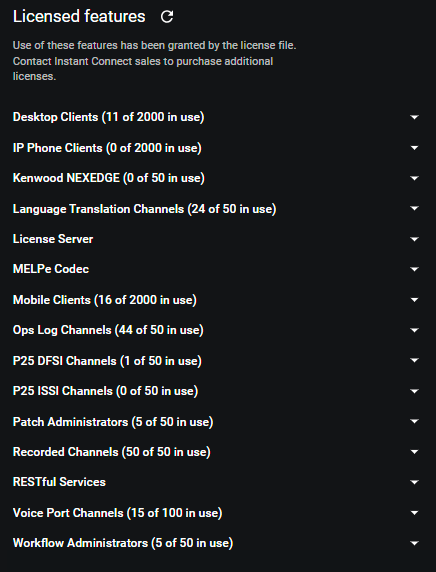
First determine the licenses available by Viewing the existing licensed feature Counts.
 | Each ICE License provides a list of Features and their allowed quantities (Counts). To view the licenses on your ICE Server, navigate to the Settings > License. (Shown at left). Features that are in use are cannot be added to a Subordinate License. For example, in the image at left there are 2,000 Mobile Client features and 16 of them are in use. This leaves 1,984 available for Subordinate Licensing. Features added to a Child license are removed from this list and unavailable to the Parent Server until the Child license expires. |
To create a subordinate license
1. Log in to the Child server using ICE Desktop with an admin account. The Child server is the server that will receive the Subordinate License.
2. On the Child server, Navigate to Settings > License.
3. In the Installation ID field (top right side of page) click the Clipboard icon.

The Installation ID for the Child Server is copied to your clipboard.

The Installation ID for the Child Server is copied to your clipboard.
Important: Do not use the Installation ID from the Parent Server. The Installation ID must come from the Child Server to receive the license. (Child gives ID to Parent).
Additionally, if you remain on the same computer when switching computers, you can paste the ID between sessions. If you are not logging in to the Parent server on the same computer as the Child, then you will need transfer the Child ID to the Parent via thumbdrive, email, or another preferred method. Consult with the security policies of your organization.
4. On ICE Desktop, log out of the Child Server and log in to the Parent ICE Server that will be donating the licenses.
5. On the Parent server, navigate to Settings > License.
The Subordinate Licenses section appears on the right side of the page.

The Subordinate Licenses section appears on the right side of the page.

6. Click the Add (+) icon in the lower right corner, and then click + Add Subordinate License.

The Create subordinate license window opens.

The Create subordinate license window opens.
7. Place your cursor in the Installation ID field and paste the Installation ID copied the Child Server in Step 3.
8. In the Name field, provide a name for the license. Optionally, add a description. Both will appear in the Settings > License > Subordinate License list once the license is created.
9. In the Expiration Date field, click the calendar icon and select the expiration date for this Subordinate License. When this date expires, the license counts return to the Parent Server and the features in the Child Server license no longer function.
10. Leave Lite Mode unselected unless you are creating a license for an ICE Lite Server.

Note: This button is for ICE Lite deployments only and limits the features and their quantities. If you are creating a license for an ICE Lite Server, review the ICE Lite Subordinate Licenses section for additional instructions.
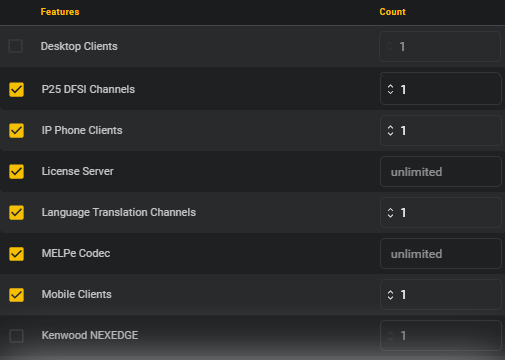
11. Select the Features to include and use the Count fields to specify the number of each feature. Unselected features will not be included in the license.

The maximum Count you can add is determined by the quantities of each Feature on the Licensing Server. If you exceed the quantity available, the permitted range appears below the Count field.


The maximum Count you can add is determined by the quantities of each Feature on the Licensing Server. If you exceed the quantity available, the permitted range appears below the Count field.

Note: Creating Subordinate Licenses requires the Subordinate License feature. Ensure you select this feature if you want the ICE Server using this license to be capable of creating Subordinate Licenses. If not, leave this feature unselected.
12. Click the Create and Download button.
13. Click OK to confirm the action.
A file browser window opens.
A file browser window opens.
14. In the File Name field, provide a name for the license.
15. Confirm the location for the license and click the Save button.
Important: Once you confirm the creation of the license, the features in the license will be removed from the Parent server and will not be accessible or usable to the Parent server until the license expires. This action is irrevocable.
16. Click the Refresh icon on the Subordinate License title.

The new license appears in the Subordinate Licenses list. A download link for the license is included in the expanded details in case the original download is unavailable during licensing.

The new license appears in the Subordinate Licenses list. A download link for the license is included in the expanded details in case the original download is unavailable during licensing.
To apply a subordinate license
1. Log in to any Small, Medium, or Large ICE Server as an Administrator.
Note: ICE Lite Servers require a special Lite license. Refer to ICE Lite Subordinate Licenses.
2. Navigate to Settings > License.
3. Click the Load License File button.
4. Select the subordinate license file and click Open.
The ICE Server evaluates the license and adds its features to the Licenses Features list. Most newly licensed features appear immediately. Session-based features, such as the MELPe, PA, and WFA licenses, require that you log out and log back in to start a new session before they appear.
The ICE Server evaluates the license and adds its features to the Licenses Features list. Most newly licensed features appear immediately. Session-based features, such as the MELPe, PA, and WFA licenses, require that you log out and log back in to start a new session before they appear.